Unity Cookbook. Pathfinding
Pathfinding
Artificial Intelligence (AI)
- In video games, AI is a catch-all term for techniques to create seemingly intelligent non-player characters (NPCs)
- Nothing to do with machine learning, a technique behind more sophisticated AI systems
- The most important problem in programming a game AI:
- “How to figure out a path from A to B?”
- After this is solved, we can easily…
- make enemies patrol around
- make enemies follow the player
- make enemies attack other enemies?!?
- One of the earliest games to utilize pathfinding was Tanktics (1976)
Note
- Pathfinding is not necessary to create interesting enemy behaviour, though
- In Super Mario Bros, enemies just go left and right
- You can create complex behaviour out of reactive rules without pathfinding!
Quick intro to Unity 3D Navigation System
- Learn: Navigation
- Manual: Navigation and pathfinding
- Manual: Navigation System in Unity
- In 3D, we can use the Unity Navigation System for pathfinding
- It consists of:
- NavMesh: walkable surfaces
- NavMesh Agent: entities that walk on NavMeshes
- NavMesh Link: shortcuts
- NavMesh Obstacle: movable objects blocking navigation
2D pathfinding
- Unity doesn’t have 2D NavMeshes by default, yay
- There are many 3rd party assets for that, though
- Aron Granberg: A* (This is the one we’ll be using!)
- H8man: NavMeshPlus
- Nodal Pathfinding in Unity 2D with A*
- noobtuts: Navigation2D
A* pathfinding algorithm
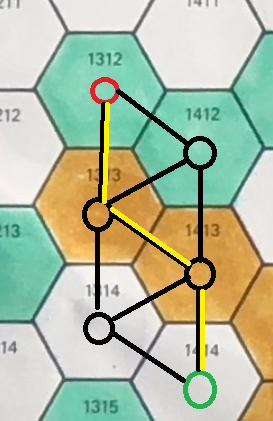
- [A](https://en.wikipedia.org/wiki/A_search_algorithm) (pronounced A-star) is a pathfinding algorithm commonly used in video games
- For an interactive example of A* and other pathfinding algorithms, see Pathfinding.js
- Pathfinding happens on a graph: a network of possible routes
- The network consists of nodes (a.k.a. waypoints) (marked with circles in the image) that are connected by lines
- The path from point A (red circle) to point B (green circle) can only be created via connected nodes
- A gap in the map could be created by removing a connection between nodes
Adding A* pathfinding to your 2D project
1) Download the free version of the A* project here 2) Drag and drop the downloaded Unitypackage file to your Unity editor, then click Import. Now it’s in your Assets folder! 3) Create a new Empty GameObject and name it Pathfinder. 1) Add a new component, also named Pathfinder to it.
Setting up the Pathfinder component
5) Inspector > Add new Graph > Grid graph (A* Docs: Grid graph)
6) Check the 2D box. Now the graph should be visible in the Scene view.
7) Also check the Use 2D physics box.
8) Set the Obstacle Layer Mask to Everything or a specific layer of your collision tiles.
-
Note: Not the sorting layer; a layer of the tilemap GameObject! 9) Make the graph bigger with the Scale tool to envelop the whole level. 10) Click Scan in the bottom to update the grid. (Do this after every change!) 11) Click on the Eye icon in your Grid Graph to hide the scan.
- Note: You can largen the Diameter if your paths go too close to walls.
- Note 2: Uncheck Cut Corners so the enemies won’t
Setting up the enemy
1) Create a new Empty GameObject named Enemy 2) Create a new 2D Sprite GameObject named EnemyGfx as the child of Enemy 3) Add a new component AI Path (2D,3D) to Enemy. This adds two components: 1) a Seeker script that seeks the path 2) an AI path script that controls the movement 4) For AI Path, set Orientation to YAxisForward. 5) Add a AI Destination Setter component and drag Player to Target to make the enemy follow the player.
- Note: See links for documentation!
Fine-tuning
- AI Path settings to consider:
- Pick Next Waypoint Dist: The distance where the script picks the next waypoint
- Max Speed
- Radius
- Gravity (you might need to set this to None)
- Enable Rotation
- To show the path in real time, enable Gizmos > Seeker in Game Mode.
Path Scripting
- In AI destination Setter component, the Target is a public variable, so you can change it from any script with
_aiDestinationSetter.target = newTarget; - Sometimes you need to scan the path again to update it dynamically:
path.active.Scan(); - To add custom functionality to when AI Path has reached its target, you can add code to AIPath.cs in method
onTargetReached:public virtual void OnTargetReached () { SendMessage("TargetIsReached"); }
Scripting 1. Flip the sprite based on velocity
using Pathfinding;

[SerializeField] AIPath aiPath;

void Update()
{
  if (aiPath.desiredVelocity.x > 0.0f)
    _spriteRenderer.flipX = false;
  else if (aiPath.desiredVelocity.x < 0.0f)
    _spriteRenderer.flipX = true;
}
Scripting 2. Changing target when on screen
- When enemy is on screen, make it follow the player.
- Otherwise, make it return to its spawn point.
- Add an empty GameObject “EnemySpawnpoints” in the scene that will be used as a container for spawn points.
I. Setup
using Pathfinding;

public class FollowOnScreen : MonoBehaviour
{
    AIDestinationSetter aiset;
    GameObject Player;
    GameObject Spawnpoint;
    GameObject Spawnpointcontainer;

    void Start()
    {
        aiset = GetComponent<AIDestinationSetter>();
        Player = GameObject.FindGameObjectWithTag("Player");
        // Find Enemyspawnpoints GameObject & create a new empty Spawnpoint as its child
        Spawnpointcontainer = GameObject.Find("EnemySpawnpoints");
        Spawnpoint = Instantiate(
            new GameObject(),
            transform.position,
            transform.rotation,
            Spawnpointcontainer.transform
        );
    }
II. Behaviour
    bool OnScreen()
    {
        float cameraHalfHeight = Camera.main.orthographicSize;
        float cameraHalfWidth = cameraHalfHeight * Camera.main.aspect;
        Vector3 difference = Camera.main.transform.position - transform.position;
        return (
            Mathf.Abs(difference.x) < cameraHalfWidth
            && Mathf.Abs(difference.y) < cameraHalfHeight
        );
    }
    void Update()
    {

        if (OnScreen())
            aiset.target = Player.transform;
        else
            aiset.target = Spawnpoint.transform;
    }
}
Scripting 3. Moving between targets
- Enemy has an empty child GameObject Patrolpoints that contains empty GameObjects Point1, Point2, etc.
- These are the targets the enemy moves between
- We don’t create any new GameObjects now, but instead we move the whole Patrolpoints GameObject under the EnemyPatrolpoints GameObject.
- We add the patrol point transforms to a list.
- Then, when enemy reaches a point, it gets assigned the next target on the list.
I. Setup
using Pathfinding;

public class PatrolEnemy : MonoBehaviour
{
    AIDestinationSetter aiset;
    AIPath aipath;
    [SerializeField] List<Transform> patrolPoints = new List<Transform>();
    [SerializeField] int currentTarget;

    void Start()
    {
        aiset = GetComponent<AIDestinationSetter>();
        aipath = GetComponent<AIPath>();

        // move patrolpoints under enemypatrolpoints so they won't move as enemy moves
        Transform points = transform.Find("Patrolpoints");
        GameObject newParent = GameObject.Find("EnemyPatrolpoints");
        points.SetParent(newParent.transform);

        for (int i = 0; i < points.childCount; i++)
        {
            patrolPoints.Add(points.GetChild(i));
        }
        SetCurrentTarget(0);
    }
II. Behaviour
    void SetCurrentTarget(int i)
    {
        // modulo makes sure we choose a target from the list
        aiset.target = patrolPoints[i % patrolPoints.Count];
        currentTarget = i % patrolPoints.Count;
    }

    void Update()
    {
        Vector3 distance = aiset.target.transform.position - transform.position;

        // endReachedDistance can be changed in AI Path component's inspector
        if (distance.magnitude < aipath.endReachedDistance)
            SetCurrentTarget(currentTarget + 1);
    }
}
Scripting 4. Custom behaviour
- The following Enemy behaviour script is an alternative to the AI Path and AI Destination Setter scripts, so remove them if you follow these.
- You do need the Seeker script, however!
- Add a Collider component so your Enemy can’t walk through obstacles.
- Add a Rigidbody so you can control your Enemy with forces and collisions.
I. Initializations
using System.Collections;
using System.Collections.Generic;
using UnityEngine;
using Pathfinding;

public class EnemyAI: MonoBehaviour
{
    [SerializeField] Transform target;
    [SerializeField] float speed = 200f;
    [SerializeField] float nextWaypointDistance = 3f;

    Path path;
    Seeker seeker;
    Rigidbody2D rb;

    int currentWaypoint = 0;
    bool reachedEndOfPath = false;

    ...
I
II. Start, UpdatePath, OnPathComplete
void Start()
{
    seeker = GetComponent<Seeker>();
    rb = GetComponent<Rigidbody2D>();

    InvokeRepeating("UpdatePath", Of, .5f);
}
void UpdatePath()
{
    if (seeker.IsDone())
        seeker.StartPath(rb.position, target.position, OnPathComplete);
}
void OnPathComplete (Path p)
{
    if (!p.error)
    {
      path = p;
      currentWaypoint = 0;
    }
}
III. FixedUpdate
void FixedUpdate()
{
    if (path == null)
        return;

    if (currentWaypoint >= path.vectorPath.Count)
    {
        reachedEndOfPath = true;
        return;
    }
    else
    {
        reachedEndOfPath = false;
    }
    Vector2 direction = ((Vector2) path.vectorPath[currentWaypoint] - rb.position).normalized;
    Vector2 force = direction * speed * Time.deltaTime;

    rb.AddForce(force);

    float distance = Vector2.Distance(rb.position, path.vectorPath[currentWaypoint]);

    if (distance < nextWaypointDistance)
    {
        currentWaypoint++;
    }
}
Exercise 0. Point and click
Make a point and click character controller:
- When you click on a walkable spot, make the character walk to it.
Exercise 1. Enemy on patrol
Create a non-player character that patrols between three points on a 2d top-down area.
Exercise 2. Tactical Espionage Action
Add a visibility cone for the enemy. If it sees the player, make it follow it.
If the player is outside the visibility cone for five seconds, make the enemy return to its patrol route.