Input system

1. Installation & Setup

  1. Install the Input System package to your project
    • Set the option Project Settings > Player > Other settings > Configuration > Active Input Handling: Both
    • This enables both the new Input System and the old Input Manager.
  2. Create a new Input action asset (a .inputactions file) in Create > Input Actions.

Input actions

  • Input System Manual: Input Actions
  • The purpose of input actions is to separate the input checking from the actual performed action
  • After all, we might want a player to jump by pressing spacebar, pressing the A button of controller #1, touching an on-screen button, etc!
    • In the Input System, these are called Input Schemes.
  • So in the code, we don't want to check those all at once (what if the mappings change?), but rather check if a certain action has triggered

This is how an input action asset looks like in Unity.

Input action asset

  • In the input asset window we define which inputs the actions are mapped to.
  • On the left, we have the Action Maps panel
    • For instance, in a multiplayer game we would have different maps for different players.
    • In the image above, we have action maps for Player and UI.
  • In the middle, we have the Actions panel
    • Actions are defined here (green).
    • Their input bindings are under the actions (blue).
    • Composite bindings have their paths under them (pink).
  • On the right, we have the Binding properties panel
    • Here, we define what kind of input types are used for the input bindings under the Actions panel.

2. Create new bindings

  1. Press the icon in the Actions panel to create a new action Bark. By default, it has no bindings.
  2. Click <No binding> to create a new binding, or press the action's own icon (or right click the action) and create a new binding.
  3. Click Path in the Binding properties panel
    • Either search for the input you want to bind to the action
    • ...or press the Listen button and just perform the input you want to bind.

3. Add a player input component

  • To use your inputs, you need to add a Player input component to the GameObject that you want to control with your inputs:
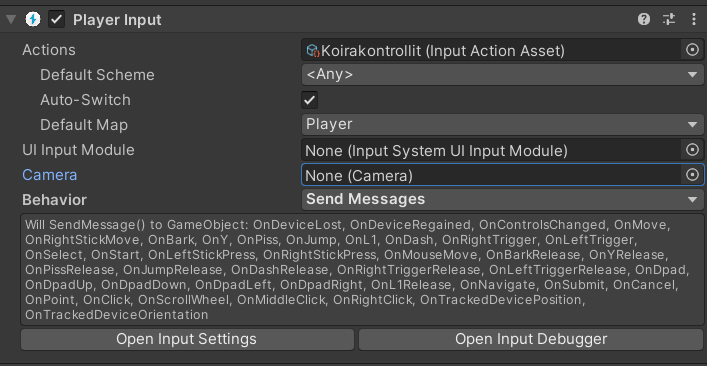
  • Under the component, drag your Input Actions asset file into the Actions slot.
  • Set the Default map to the one you want to use for this GameObject.
  • Set Behavior to Send Messages.
    • Underneath, you will see what message listener functions are now usable!

4. Use the input system in code with Send Messages

  • Add a controller script for the GameObject you added the Player input component into
  • To use the input system in the script, import the input system first with
    using UnityEngine.InputSystem;
    
  • Now, add a new message listener function according to the name of your action (you can check their names from the list mentioned earlier):
    function OnBark() {
      // do stuff
    }
    

Reading

* See connected devices in *Window > Analysis > Input Debugger* * If you don't see any devices, restart Unity.