Unity Cookbook. 2D animation
2D animation
Two ways to 2D character animation
- Sprite sheet animation
- Characters are drawn fully, and animated by hand, frame by frame
- At best, results in lifelike and beautiful motion
- At worst, the animator has to draw everything multiple times
- Learn: Sprite Animation
- Skeletal animation
- Characters consists of multiple images connected by bones
- At best, varied procedural movement out of a few assets
- At worst, stiff and unlifelike motion
- Learn: Skeletal Animation
Sprite-based animation
- For sprite basics, see: 2d Basics: Sprite renderer component
- Sprite animation can be created with multiple individual png files, or one sprite sheet with multiple animation cels
- Brackeys video: 2D animation
Creating a new animation
- Manual: Creating a new Animation Clip
- Select the GameObject you want to animate
- Open Animation Window: Window > Animation > Animation
- Click Create to create a new animation (.anim) file, or a clip
- An animation controller (.controller) gets created simultaneously as well
- Also, your GameObject gets an Animator component
- Name the first clip PlayerIdle
- Good ideas to have separate animation files for Idle, Jump, Run, etc…

- Note: The functionality of the animation timeline above relies that you keep your GameObject selected
- Otherwise, you can’t click the buttons
- Drag sprites to your Animation timeline
- Note: The final frame duration is less than the others. For an easy fix, add a new key to the end with Right click > Add key
- Set Samples to a lower value to make your new animation less frantic
- You can create new clips in the PlayerIdle dropdown
Controlling animation with code
- The fastest way to get your animations running is to control the Animator component with code
- Script Reference: Animator.Play
Animator anim = GetComponent<Animator>(); anim.Play("PlayerAttack"); - Check which animation is playing
if (anim.GetCurrentAnimatorStateInfo(0).IsName("PlayerAttack"))
{
      Debug.Log("Playing attack anim!");
}
Animator controller
- When you created new clips, an Animator Controller Asset was created
- This can be modified in the Animator Controller Window
- Manual: Animator Controller
- Note: This was previously known as Mecanim State Machine
- To actually use the transition rules, your player GameObject needs the Animator component (it was added automatically)
Animator window
- Unity Animator window, aka the Animation State Machine can seem daunting if you’re not familiar with the concept of a State Machine
- Luckily, the Manual has good resources about state machines
- Note: the animator window can be janky. E.g., If you cannot move the states around, set the inspector into Debug mode
- Inspector window > Three dots in the top right corner > Debug
Using the Animator window
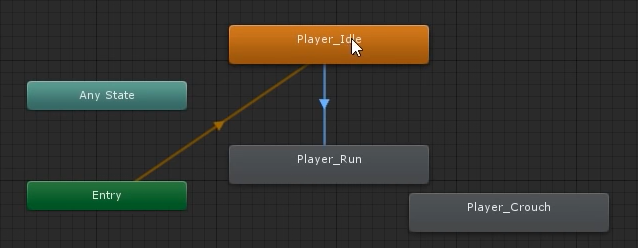
- In Animator, we can create transition rules between animation clips
- Right click a state > Make Transition
- Entry is the default state: Create an arrow from it to the idle animation!
- Click on the arrow to edit the transition
Transitions
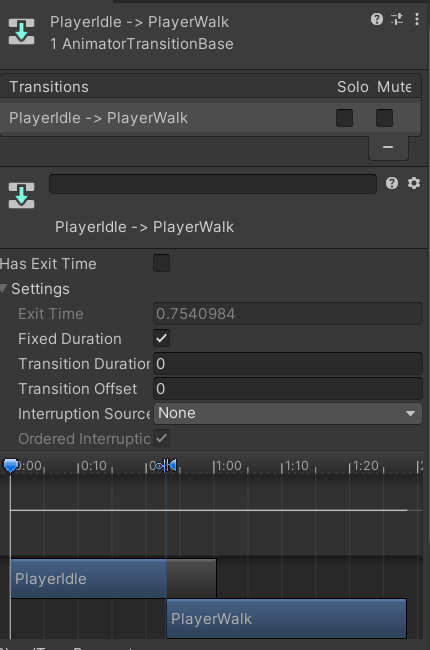
- Has Exit time:
- The most absolutely confusingly named variable of all years
- Means: “Transition will happen automatically after Exit time has passed”
- Usually we want to uncheck this.
- Settings
- Exit time: The number of loops to go through before the automatic transition
- Oh wow, it’s not even time, really
- Transition Duration: In sprite animations, we usually want to set this to 0.
- Exit time: The number of loops to go through before the automatic transition
Animation parameters
- To trigger state transitions, we control the controller’s parameters in code
- Manual: Animation Parameters
- Change the Layers view to Parameters
- Create a new float parameter named Speed
- Go to a transition, and create a new condition for the parameter
[SerializeField] Animator anim; anim.SetFloat("Speed",_rigidbody.velocity.Magnitude); anim.SetTrigger("StartWalking")works similarly
Animation clip properties

- We can control component properties straight from the animation clips themselves
- Use case: If we want to use the same walk animation sprites for PlayerWalkLeft that we have for PlayerWalkRight
- In the PlayerWalkLeft animation clip, click Add Property
- Choose Sprite Renderer Component
- Choose the FlipX property
- Tick the box, and move the created key to the start of the clip
Blend trees
- Having animation states for all moving directions can lead to “transition hell”
- We can keep the base layer simpler by creating blend trees: Manual: Blend trees
- A common usage for blend trees is to add directional animation:
- E.g., a PlayerWalk blend tree that contains PlayerWalkDown, PlayerWalkUp, etc states
- Create a blend tree by right-clicking the animator background and choose
- Create state > From new blend tree
- Name the blend tree to PlayerWalk, and double click the blend tree to open it
- Note: You can also convert an existing state into a blend tree with Right click > Create blend tree from state
Creating a 2D blend tree
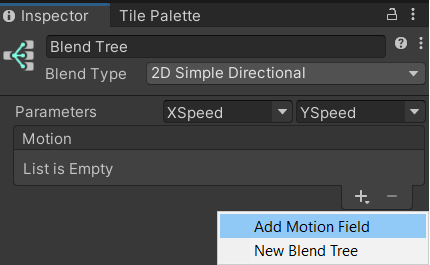
- Change Blend type to 2D Simple directional.
- Set two float parameters to control the blend tree (here: XSpeed and YSpeed)
- Create the parameters if you need to.
- Press + to add four empty Motion fields (a.k.a., slots for the animation clips) to the blend tree
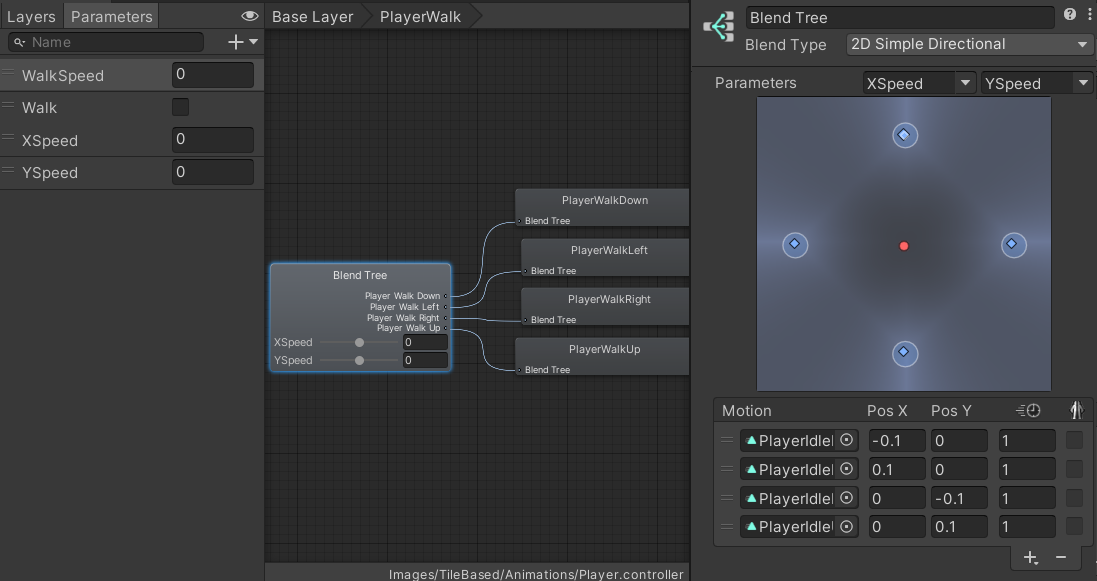
Adding animation clips to a blend tree
- Drag the animation clips from the Project view to motion fields
- Set the Pos X and Pos Y parameters or drag the motion fields to their corresponding positions (PlayerWalkDown should be down, etc.)
- Values of 0.1 seem to work well so the states are triggered even when the analog stick is moved slightly. See image in the previous slide!
- Now, when you change the values of the parameters XSpeed and YSpeed, the blend tree will go to the motion field that matches the values the best
Animation controller example
displacement = new Vector2(Input.GetAxis("Horizontal"), Input.GetAxis("Vertical"));
displacement = Vector2.ClampMagnitude(displacement, 1);
rb.velocity = displacement * Time.deltaTime * walkSpeed;

animator.SetFloat("WalkSpeed", rb.velocity.magnitude);

if (displacement.magnitude > 0.1f)
{
    animator.SetFloat("XSpeed", displacement.x);
    animator.SetFloat("YSpeed", displacement.y);
}
- Here, we set three properties:
- WalkSpeed is used to transition between PlayerIdle and PlayerWalk blend trees
- XSpeed and YSpeed are used to choose direction in the blend trees
- Note that we don’t reset them when movement stops!
Controlling animation clip speed
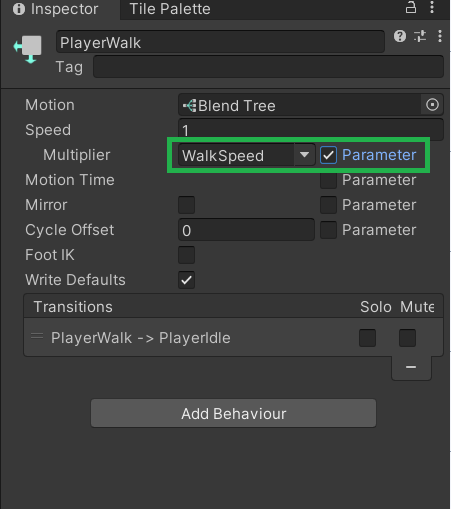
- You can control the speed an animation clip is played easily by setting a parameter to control it
- Click on a state in the animator to show it in the inspector
- Check Parameter under Speed
- Choose the float parameter you want to use as a multiplier for the animation clip speed
- Done!
Extra: Animation Events
- Manual: Using Animation Events
- You can add animation events to call a function in a specific point of an animation
Extra: State machine behaviour scripts
- Manual: State Machine Behaviours
- To add functionality to animation states, you can add state machine behaviours
Extra: UI animations
Extras
- 9-Slicing
- Sprite Masks
- Sprite Creator
- For creating (placeholder) sprite graphics
- Assets > Create > Sprites
- Manual: Sprite Creator
Extras: Pixel art in Unity
- Sprite import:
- Texture type: Sprite (2D and UI)
- Pixels Per Unit: Tile size (e.g., 32)
- Filter Mode: Point (No filter)
- Compression: None
- Edit > Project Settings > Quality > Anti-aliasing: Disabled
- Preparing for pixelart
- Pixel perfect camera
- Packages: Pixel perfect camera
- Many issues can be fixed by using a pixel perfect camera instead of a basic camera
- For instance, you can crop the play area to represent a low resolution display
- This can also be used for uniformly scaling the pixels by an integer amount
- Note: If you still see black gaps in your tilemaps after following these instructions, create a new material with the Sprites/Default shader and check Pixel snap. Then, add this material to every Tilemap renderer.