VS Code setup
VS Code setup
What is Visual Studio Code?
- VS Code (or just VSC) is a popular open source text editor / IDE (integrated development environment) by Microsoft
- Very extensible by extensions
- Has many language-specific features like Omnisharp for C#
Visual Studio Code is not Visual Studio
- Visual Studio is an older, bulkier IDE, also by Microsoft
- it has more features!
- Visual Studio Code is quite new, relatively lightweight
- originally scarce in features
- more popular in web development
- Both are used for Unity development
- We’ll be using VS Code on this course
- Note: VS Code Unity Debug Extension has been recently deprecated
- We don’t need the extension on this course, but it’s good to know
VS Code installation
- During installation, check these two options:

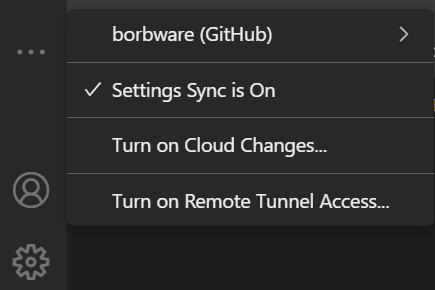
Logging into VS Code
- You can log in with your GitHub account to VS Code in the Accounts tab
- Then, by turning on Settings sync, your user-defined settings are carried over to whichever computer you’re working on
Unity side setup
- Include the Visual Studio Editor Package in your projects
- If you removed it, you can add it in Window > Package Manager
- Historical note: Yes, it says Visual Studio Editor, without the “Code”. Previously, the Visual Studio Code Editor package was used; as of 2023, it is considered a legacy package.
- Set VS Code as your Unity default editor
- Edit > Preferences > External Tools > External Script Editor
- You might have to click the Regenerate project files button to get all features working
VS Code side setup
- Install the prerequisities for code completion & other niceness
- You need to install these applications:
- .NET Core SDK
- Remember to reboot your computer after installing
- .NET Framework 4.7.1 Developer Pack
- Be sure to download the Developer pack, not Runtime!!
- Note: In Windows, it’s not shown as “developer pack” but as “targeting pack”
- Be sure to download the Developer pack, not Runtime!!
- .NET Core SDK
- You need to install these applications:
- Also, install these VS Code extensions:
- Open the project folder in VS Code
- Either by opening the folder from File Explorer context menu (Open with Code)
- Or in VS Code File > Open Folder…
Omnisharp
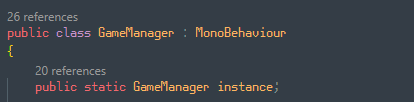
- Omnisharp is a set of tools that makes programming C# easier
- After the previous procedure, VS code should have Omnisharp enabled
- Number of references are shown on top of every variable & class
- You can hover over a method name to see details

- argument types, return types, method overloads…
- Number of references are shown on top of every variable & class
- error:
Could not locate ms build instance to register with Omnisharp- $\Rightarrow$ download Build tools for Visual Studio 2022 here
Omnisharp troubleshooting
- Sometimes Omnisharp stops working. Here’s something you can try to fix it:
1) Check that .NET is installed by running
dotnetin the VS code terminal 2) In Unity: Edit > Preferences > External tools > Regenerate Project Files 3) In Unity:Open VS Code with Assets > Open C# Project4) In VS Code: CTRL+SHIFT+P > Omnisharp: Restart Omnisharp 5) In VS Code: Add this line inside the curly braces to the configuration file.vscode/settings.json:"omnisharp.useModernNet": false
Extra: Other extensions
- Marp for VS Code
- If you want to read these slides inside VS Code
- After installation, open this .md file from the course repository
-
Click the Open preview to the side button

- GitLens & Git Graph (See Git basics)