Module 1
Module 1
What to expect
- C# basics
- Unity basics (in 3d)
- Some programming
- Git basics
- A Module project
- One-on-one meetings with me
Module 1 Schedule
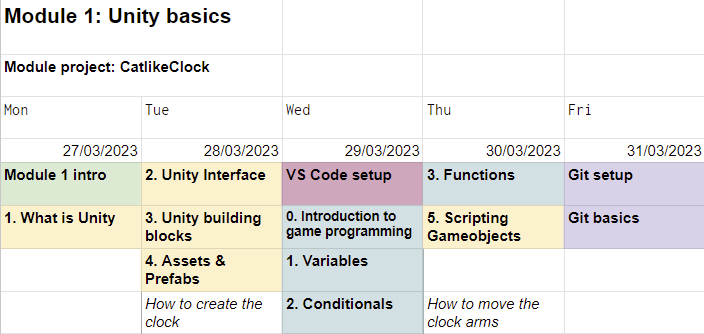
Day 1: Introduction
Schedule
- Introduction
- Setup
- Unity basics 0: What is Unity?
- Unity basics 1: The Unity Interface
- Working on exercises & Module project
Applications
- (They’re all preinstalled on your laptops already)
- Download Unity Hub
- Install the latest Unity LTS (long term support) version 2021.3.21f1
- Install Visual Studio Code, aka VS code
- See Tooltips: Unity and VS Code
- Install Discord
- (The video calls don’t work well with the browser version!)
Module projects
- During Stage 1, a new module project is introduced every module
- We will continuously work on it during the module
- Deadline for the project is the last day of the module
- The projects are showcased on that day
- Every project has three separate stages
- ⭐ The MVP (minimum viable product)
- ⭐⭐ Some extra feature included
- ⭐⭐⭐ Includes an advanced feature (which isn’t necessarily introduced during the classes), or a feature of your own design
- you can choose which stage you aim to complete
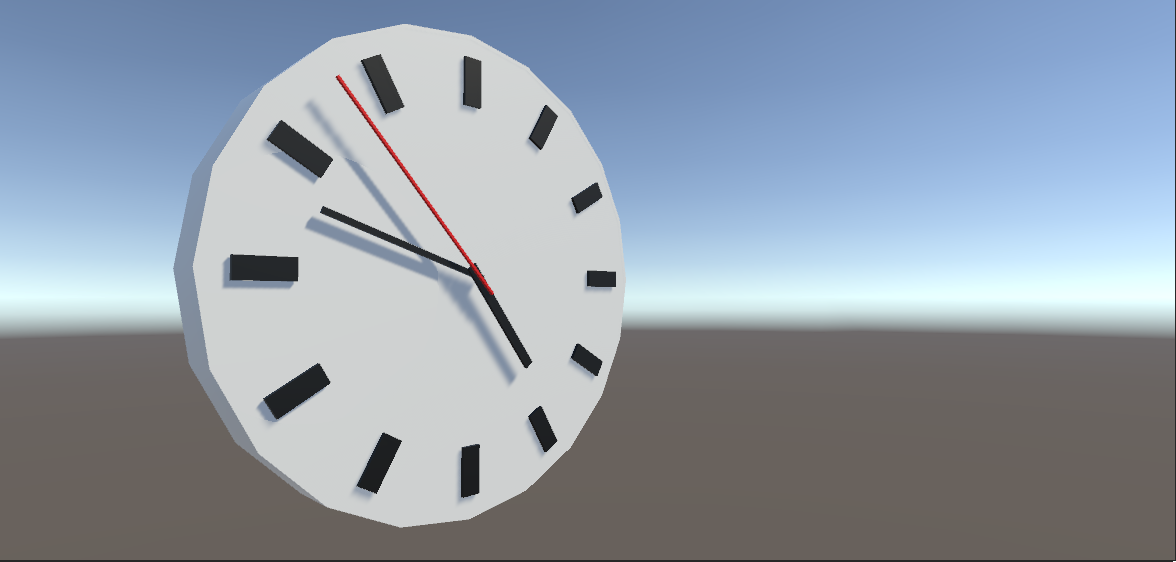
Module project 1: Clock
For the first Module project, you will create a 3d model of a clock with ticking hour, minute and second indicators.
The project is separated into individual exercises.
MP Exercise 1. Creating a project
- Install and setup all the tools needed and create your first 3D project for the course with the name
Module1Clock. - This project will be worked on step by step in the coming exercises.
MP Exercise 2. Building a static clock

- Create a 3D model of a clock from Unity’s primitives with three hands and 12 hour indicators.
- Create a hierarchy of GameObjects as seen on the left.
Clock,PivotandHourIndicatorsare Empty GameObjects.
- Unlike in the picture in a past slide, set all the indicators to 12. They will be rotated later with C# scripting.
- The indicators are all white for now - we set the materials later.
Day 2
MP Exercise 3: Materials
- Create three materials for the clock: White, Red and Black.
- Create a picture in your project’s Assets folder and use it as a texture for White.
Day 3: Scripting 1
Day 4: Scripting 2
MP Exercise 4: Using prefabs
Create a prefab out of the clock and then create a duplicate of it into the scene.
Extra: Make the indicator a prefab, and make the others duplicates of it.
MP exercise 5. Animating the clock
Make the clock hands move when time goes on.
⭐ Make the movement instantaneous: the second indicator moves once per second directly to the next position
⭐⭐ Make the movement smooth: the second indicator moves continuously at a rate of one full rotation per minute
⭐⭐⭐ Make the movement realistic: study how the hands of a real clock moves! The second indicator moves incrementally between fixed positions, but the movement is not instantaneous. Try to replicate this.
Day 5: Git
MP Exercise 6. Git Repository
- Create a remote repository for your Module project with the Unity gitignore file. The repository should be named
ModuleProject1Clock, or something along the lines. - Initialize Git in your Module project repository.
- Add remote (the one you just created), and pull the changes.
- Commit and Push your code to GitHub.